Building a Many-to-Many Modeled REST API with Django Rest Framework
Building a REST API is very easy and there are lots of tutorials online on how to do it. I’ll be adding this tutorial to that list. In this tutorial, we’ll be building a REST API with the Django REST framework and the entities in this tutorial will be in a many-to- many relationship.
I’ll explain a ‘many-to-many’ with a simple analogy; Let’s say you have have two entities, authors and books, an author can write many books and a book can be written by many authors. Why REST API?
A REST API is a standard way to pass data within applications and these applications may consume data in any way.
There are a few key options for a REST API request:
- GET: The most common option, this option returns some data from the API based on the endpoint you visit and any parameters you provide. Most web browsers perform this by default.
- POST: This option creates a new record that gets appended to the database.
- PUT: This option looks for a record at the given URI provided. If it exists, update the existing record, and If not it will create a new record.
- DELETE: This option deletes the record at the given URI.
- PATCH: This option updates individual fields of a record.
Basically, an API is a gateway into a database. The API backend handles querying the database and formatting the response. What you receive is a static response, usually in JSON format of whatever resource you requested. We’ll be using JSON for this tutorial anyway.
REST APIs are common in software development and it’s essential for a developer to know how they work and how to build them.
Our API contains two entities: both authors and books. To get started let’s create a folder for our project and create our virtual environment with the following commands.
sudo pip install virtualenv
virtualenv env
source env/bin/activate
We’ll be using a virtual environment for this project to manage all our dependencies. Also, let’s create a requirement.txt file in our root directory. It is important because if we end deploying our code whichever service we use would require a requirements.txt file to install our dependencies in the cloud.
Let’s paste the following into the file
Django
djangorestframework
psycopg2-binary
and run the following in your terminal to install the dependencies
pip install -r requirements.txtNow we have our dependencies installed and we can start the project. Let’s start by running the following commands.
django-admin.py startproject sampleproject
cd sampleproject
django-admin.py startapp authors
This creates our project template code which we will build upon and to continue let’s add the following to our settings.py file located in the sample project folder.
INSTALLED_APPS = [
    'django.contrib.admin',
    'django.contrib.auth',
    'django.contrib.contenttypes',
    'django.contrib.sessions',
    'django.contrib.messages',
    'django.contrib.staticfiles',

    #app
    'authors',    #authentication
   'rest_framework.authtoken',#rest_framework
    'rest_framework',
]REST_FRAMEWORK = {
    # Use Django's standard `django.contrib.auth` permissions,
    # or allow read-only access for unauthenticated users.    'DEFAULT_PERMISSION_CLASSES': [
    'rest_framework.permissions.IsAuthenticated',
    ],
    'DEFAULT_AUTHENTICATION_CLASSES': (
    'rest_framework.authentication.TokenAuthentication',),
    }
This makes Django recognize our app, every API needs some form of security and django comes with it’s own authentication class. The second dictionary represents just that. We’ll use that later in the tutorial.
Now let’s create our models with the following code.
The important thing to note here is the “related_name” argument which will be used to represent the relationship on the reverse side which is on the books model.
Right now we’ll want to migrate our new models to the database but we haven’t configured that yet so let’s do that, For this project i’ll be using postgres and the DATABASE section in settings.py should look like this.
DATABASES = {
    'default': {
    'ENGINE': 'django.db.backends.postgresql_psycopg2',
    'NAME': 'tutorial_db',
    'USER': '<DATABASE USER>',
    'PASSWORD': '<DATABASE PASSWORD>',
    'HOST': 'localhost',
    'PORT': '5432',
    }
}
The database user and password should be what grants you access to you database. For more information on setting that up you can check out this article.
Now we can perform our migrations with the following commands on our terminal.
python manage.py makemigrations
python manage.py migrate
Serializers
Serializers allow complex data such as querysets and model instances to be converted to native Python datatypes that can then be easily rendered into JSON, XML or other content types. Serializers also provide deserialization, allowing parsed data to be converted back into complex types, after first validating the incoming data.
Our database is fired up. Now let’s setup our serializers by adding the following to our code.
We create the UserSerializer from the django auth.model which we use as a form of authentication for our API. The AuthorSerializer class is straight forward and we use the inner Meta class to represent all the fields that’ll be present in our API. The BookSerializer is pretty much the same with AuthorSerializer except we add a read_only argument which makes it possible to view serialized author objects assigned to a book objects. Also, the nested fields won’t be required at the creation of the objects because they may not exist at the time of creation. We can add them later with PATCH requests.
We’re almost at the finish line so let’s create our viewsets. Django REST framework allows you to combine the logic for a set of related views in a single class, called a viewsets. In other frameworks you may also find conceptually similar implementations named something like 'Resources' or 'Controllers'. Let’s create our views with the following code.
Easy right? With this we just made it possible to perform basic CRUD operations on our data. The code is pretty self explanatory and it’s customizable, you can get the django rest documentation if you want to do a custom implementation of your views.
Django provides clean and consistent way for creating you urls we’ll see that in the following code. Let’s add the following to our urls.py file, it’s in the same folder with settings.py and wsgi.py and let’s add the following code.
This generates the following URL patterns.
URL pattern: ^api/authors/$
URL pattern: ^api/authors/{pk}/$
URL pattern: ^api/books/$
URL pattern: ^api/books/{pk}/$
Now’s run our application with the following command.
python manage.py runserver 8100Tests
We’ll be testing our API with Postman and let’s jump right into it with a POST request to authors endpoint.
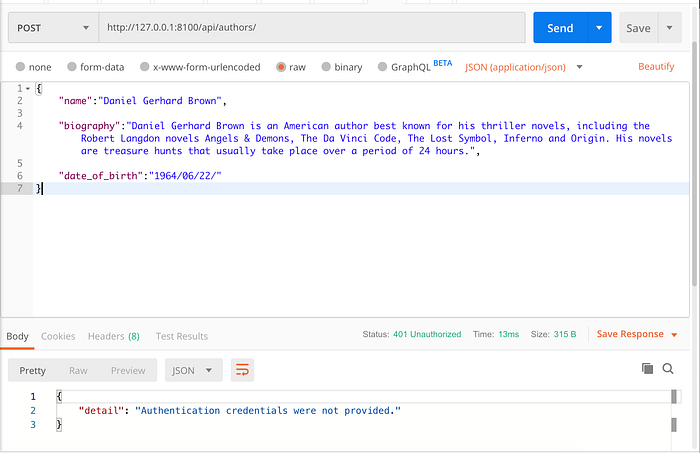
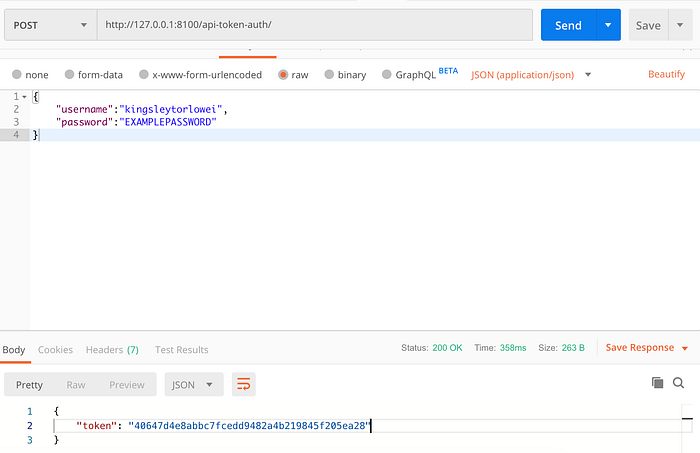
Oh snap! Let’s get our authentication credentials with the following commands.
python manage.py createsuperuserFollow the steps and let’s try to login with the following request to our auth endpoint.
Now let’s add the token to the header and try the POST request again.
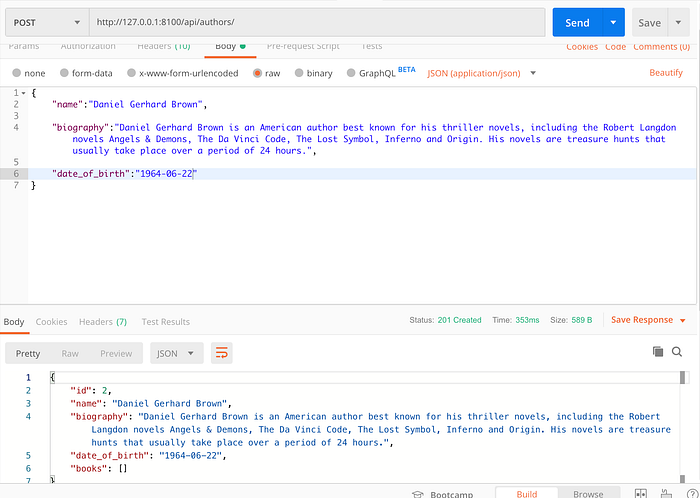
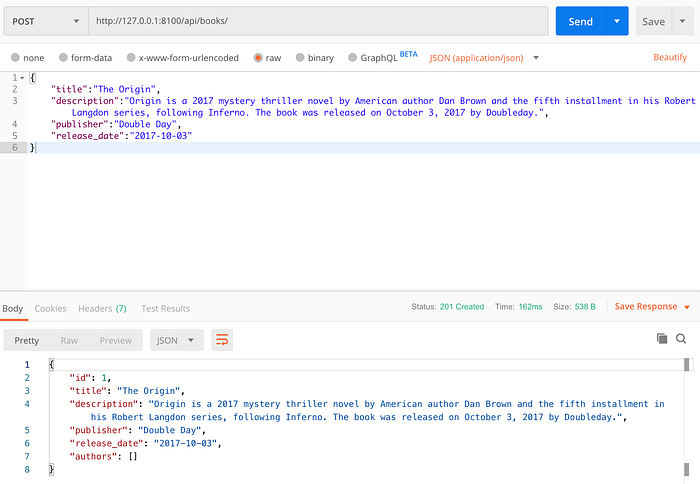
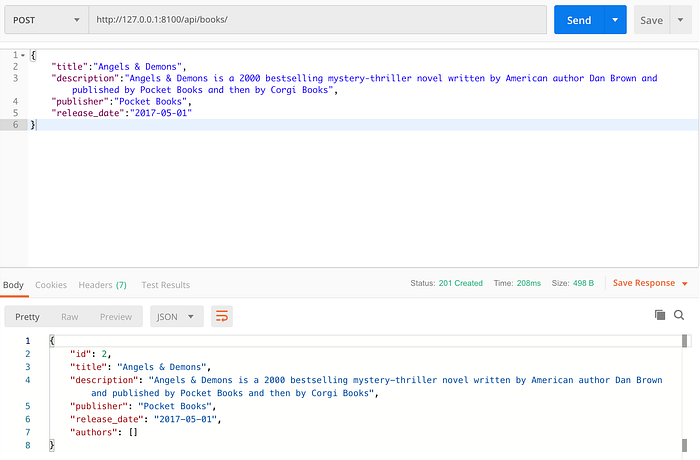
Awesome! Now let’s create a multiple books to add to the author
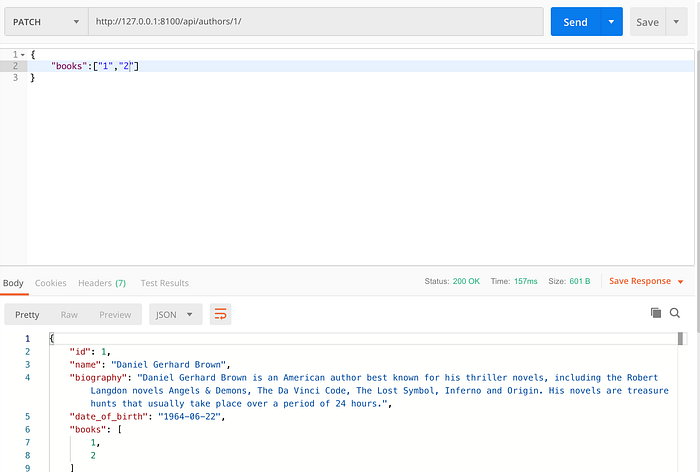
Works well! Now let’s attach the books to the author.
And finally let’s perform a GET request on a serialized and nested book entity.

Awesome! Seems like main functionality works just fine.
Additional Resources
I also recommend going through official DRF and Django documentations to gain a deeper understanding on the framework.
The source code for this project can found on my github.
In the second part, i will be discussing deploying the the API to the cloud. So make sure your requirements.txt file is intact.
I highly recommend this resource if you are building your API. It’s the a guide on the best practices to follow while building your API.
I hope this was helpful to you and I want to thank you for reading this post. Hit clap in case it was helpful so that others may find it too.